How do I use Insight Cloud as an Org Admin?
Page Directory: Jump to Topic
Navigate Insight Cloud
App Bar
The App Bar is at the top of the screen and features essential navigation elements. To the left, you'll notice the hamburger menu icon, which, when clicked, expands the main navigation pane. To the top right of the App Bar is a circle containing your user initials, which, when clicked, expands the account settings dropdown menu.
![]()
Homepage
When you log into Insight Cloud, you will see the Homepage, which displays your recently viewed apps, allowing you to pick up where you left off. You will also find additional apps that you may be interested in. If you ever want to return to this homepage, click the Seek Insight Cloud logo at the top left of the page in the app bar.
My User Settings
At the top right corner of the app bar, click the icon containing your user initials to view options like Settings, Help Center, Contact Us, Org Admin Training, and Logout.

Main Navigation Pane
Click on the hamburger menu to expand the main navigation pane on the left side of the screen. For an Org Admin, your navigation options include Homepage (Seek Insight Cloud Logo), Administrating your Org (Your Org Name), My Apps, My Reports, and App Store.
-
To navigate back to the Homepage, click the "Seek Insight Cloud Logo"
-
To administrate your Org, click on your Org's Name.
-
Ex: "Seek Customer Demo" Org
-
-
To view your Apps, click "My Apps"
-
To view your Reports, click "My Reports"
-
IMPORTANT: To create, edit reports, or assign Reports, you must be an Org Admin and navigate to the "Reports" section of the org administration screen by clicking on your org's name.
-
-
To view Seek's App Store, click "App Store"

Your Organization [Org Name]
As an Organization Administrator, you can manage your organization by accessing various Org Admin pages. To access these administrative pages, click on the name of your organization in the left-side navigation pane. Upon clicking your org name, you will find additional admin page options such as General, Users, Apps, Variants, and Reports. 
Zoomed-In View of Administrative Page Options
My Apps
View all the apps you've been granted access to on the My Apps page. By default, your apps will be grouped by Use Case. Depending on the industry you work in, use cases will differ. For example, for the CPG and Retail industry use cases include merchandising and replenishment. You can also group apps by Data Provider, and Publisher. For our CPG/Retail users, you can group apps by Retailer. Lastly, you can filter your apps by data type, use case, and metadata tags. Seek industry experts define these filters. If you wish to filter or group your apps based on new criteria, contact us and share your business case and preferences.

My Reports
To access and view a Report, click on "My Reports" in the left-side navigation pane.
Remember, Reports in Insight Cloud encompass visuals, tables, or any other content that your team deems valuable and wishes to swiftly incorporate into Insight Cloud for easy accessibility. For instance, a Report could be a Sigma, Tableau, PowerBI, or Alteryx dashboard crucial for your business operations.

App Store
To access Insight Cloud's App Store, Click on "App Store" in the left-side navigation pane. The App Store showcases business analytics applications available for subscription. To learn more about each app, click on the app you're interested in and view the App Description and details. To subscribe to the app, contact our team by clicking the blue "Let's Chat" button. Note: you can search and filter the App Store by Industry Vertical, Publisher, Data Type, Use Case, and other various Metadata Tags.  App Store - App Details Page:
App Store - Filters:

Administrate My Org
Invite Users
To invite users to your organization:
-
Navigate to the My Organization page
-
Stay on the Users Tab
-
Click the "Invite User" button to reveal invitation components.
-
Invite multiple users simultaneously by clicking the "+ Add More" option.
-
Remember to choose the role you want each user to have, such as Org Admin, Consumer, or Engineer.

Edit a User
To modify the First Name, Last Name, Role, Job Title, or Email Address for a user, navigate to the "Users" within your Org Admin panel. Click on the edit icon to the far right of the user's row. This will take you to that user's settings page, where you can make and save changes. Remember to click "Save Changes" when done.
You can always see how to go back to where you were by clicking on the breadcrumbs at the top of your screen. For example, the breadcrumbs below show that you clicked on org name > users > user name.

Grant or Remove App Access for a User
To manage app access for a user:
-
Navigate to the "Users" page from the Admin Panel by clicking your Org's Name.
-
Stay on the "Users" Tab and click the edit icon next to the user's name.
- Click "Apps & Reports" in the left side panel
-
Check the checkboxes next to the desired app(s) and choose either "Grant Access" or "Remove Access." Note: You can select multiple apps to grant bulk access to this user.
-
To confirm access, look at the "Access" column where apps with access will be marked with a blue icon. Click the column header to sort this access column so that you can easily see which apps this user can access.

Trigger a Password Reset for a User
To trigger a password reset for a user:
-
Navigate to the "Users" page of the Org Admin panel by clicking on your Org's name.
-
Stay on the Users Tab, click on the edit icon next to the far right of the user's name
-
Scroll down to the bottom of the page until you see the "Change Password" section
-
Click the "SEND PASSWORD RESET EMAIL" option.

Deactivate a User
To deactivate a user:
- Navigate to the "Users" page of the Org Admin panel by clicking on your Org's name.
- Stay on the Users Tab, click on the edit icon next to the far right of the user's name
- Scroll down to the bottom of the page until you see the "Change Password" section
- Click the "DEACTIVATE USER" button.
Note: Deactivating a user allows you to easily reactivate them in the future without needing to resend an invitation to your organization.
Delete a User
To remove a user from your organization
- Navigate to the "Users" page of the Org Admin panel by clicking on your Org's name.
-
Stay on the Users Tab, click on the edit icon next to the far right of the user's name
-
Scroll down to the bottom of the page until you see the "Change Password" section
-
Click on the "DELETE USER" option.
Note: Deleting a user will require you to resend an invitation to that user if you ever want to add them back to your organization.
Resend an Invitation to a User
To resend an invitation that is about to expire for a user:
- Navigate to the "Users" page of the Org Admin panel by clicking on your Org's name.
-
Stay on the Users Tab
-
Locate the user in the user list
-
Click on the "RESEND" button next to their name.
Note: Clicking "RESEND" will resend the activation email to the user, allowing them to log in to your Insight Cloud organization.

View my Account Settings
To manage your account settings:
-
Click the icon containing your initials in the top right corner of the app bar
-
Click "Settings"
-
This is your account settings page, here you can make changes to your name, email address, and job title. You can also optionally add a user picture or icon by uploading a user image.
-
To save your changes, click 'SAVE CHANGES.' To discard your changes click 'CANCEL.'
Note: Personal Account Settings are available to all users.

Change my Password
To update your password
-
Click the icon containing your initials in the top right corner of the app bar
-
Click "Settings"
-
Scroll down to the bottom of the page to find the option for changing your password
-
Update it to something secure and memorable
-
-
Click 'SAVE CHANGES.'
-
To discard your changes click 'CANCEL.'
-

View Apps
To access Apps, click "My Apps" in the left-side navigation pane. As an Org Admin, you will see any Apps that your Org is subscribed to.
Contact Us if you'd like access to more Apps. 

View Source Data Recency
To view the recency of the source data powering your apps, cast your eyes to the top left of your app underneath the app description and the variant dropdown will be text indicating the recency of both your source data and your last run.
-
Analysis as of: The date your app last ran.
-
Data as of: The date in your source data when the analysis last ran.

You can also find this information on the app settings page when you're scheduling a variant to run on a particular date/time frequency. This view includes additional contextual details like:
-
Next Scheduled Analysis: The next date/time your app will run
-
Live Source Data as of: The date in your source data currently, available should you rerun your analysis.
View Enriched Apps
To access Enriched Apps, click the "My Apps" option in the left-side navigation pane. Remember, to see Enriched Apps, your organization must have a subscription to Seek Enrich. Once you have access to Seek Enrich, and you've been subscribed to an Enriched App, the Enriched App will display on the My Apps screen amongst your other apps.

Favorite Apps & Favorite Reports
To mark an App or a Report as a favorite, click on the star icon located in the bottom right corner of an App or Report Tile. By doing this, your favorite Apps and favorite Reports will be prominently displayed directly beneath My Apps or My Reports in the navigation pane, respectively. See example below: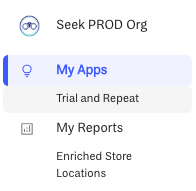
Filter an App
To filter an App, click on a filter and choose the specific criteria you want to apply. You can filter your app without needing to rerun the analysis. The filters will be immediately applied, allowing you to see the results in near real-time. To reset filters, click the 'Reset Filters' option. 
Manage Reports
What are Reports?
Reports in Insight Cloud encompass visuals, tables, or any other content that your team deems valuable and wishes to swiftly incorporate into Insight Cloud for easy accessibility. For instance, a Report could consist of a URL link to a Tableau dashboard crucial for your business operations. Another example could be a Sigma Workbook link (URL) in the developmental stages to evolve into an Insight App. Lastly, a Report might include a PowerBI link (URL) that holds significance for your business functions.
Create a Report
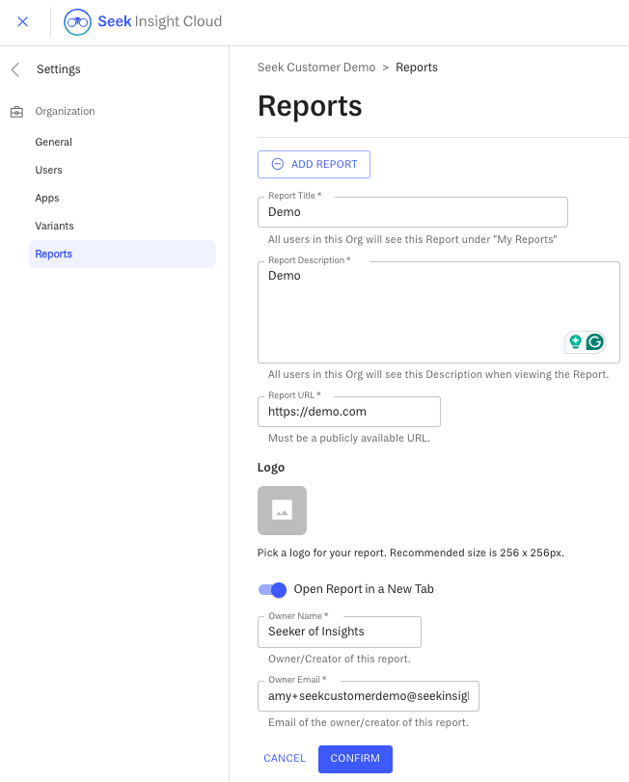
To create a Report:- Click on the "Reports" option in the Org Admin panel by clicking your Org Name.
- Click on the "+ ADD REPORT" button.
- Remember, you must include a title, description, and URL.
- Optionally add a 200 x 200 Logo for your Report.
- Click the "Confirm" button to create the Report.
- For optimal usability, open all non-Sigma Reports in a new tab by toggling on the "Open Report in New Tab" option.

- For optimal usability, open all non-Sigma Reports in a new tab by toggling on the "Open Report in New Tab" option.
Edit a Report
To make changes to a report, click on the edit icon next to the report you'd like to edit.

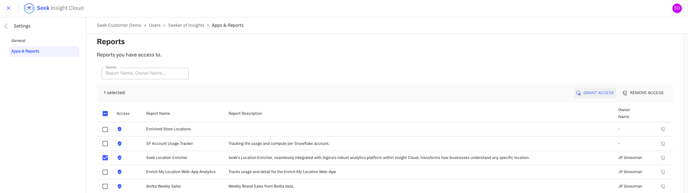
Permission a Report to a User
To grant access to a Report for a specific user:
-
Navigate to the "Users" page via the Org Admin panel by clicking on your Org's name.
-
Stay on the "users" page.
-
Locate the user you want to give access to and click on the edit icon for that user. Scroll down to the "Reports" section on the user's page.
-
Check the box next to the report you wish to grant access to, then click on the "GRANT ACCESS" button to finalize the permission.
Note: You can grant the user access to more than one report at a time by checking multiple reports before clicking "GRANT ACCESS."
Delete a Report
To delete a report, click the trash can icon next to the report within the "REPORTS" tab on the "My Organization" page.
Manage App Variants
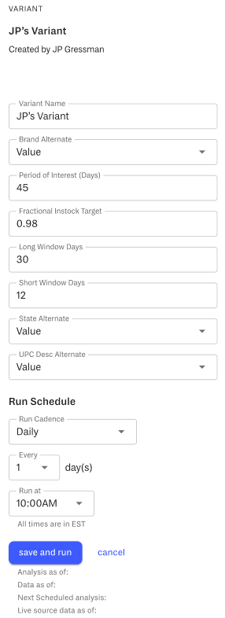
What is a Variant?
A Variant is a version of an App that is defined by unique parameter values that are used to run the analysis. Running the analysis on your apps is what provides the output tables that power your business app insights. Seek offers you recommended default variants with every app you subscribe to. Additionally, you're welcome to create multiple variants per app to meet your unique business needs. Because Variants are defined by unique parameter values, Insight Cloud will not let you create a variant with the same parameter values as an existing variant.
Variants vs. Filters & Analysis Scheduling
-
Variants: Running the analysis on any variant can take a significant amount of time as it processes billions of rows of data before the resulting data tables can be provided that power the app visualizations.
-
Filters: On the other hand, app filters are designed to be used after the analysis is complete and provide a snappier experience. It's important to understand that interacting with filters is expected to yield quick, snappy results; whereas running a variant is expected to take a significant amount of time (1 or more hours).
-
Analysis Scheduling: Once you have created a variant, we recommend setting a schedule for it to run automatically after hours or on weekends. This way, you can rapidly utilize the analysis results during your regular working hours without waiting around for the sophisticated analysis to finish running.
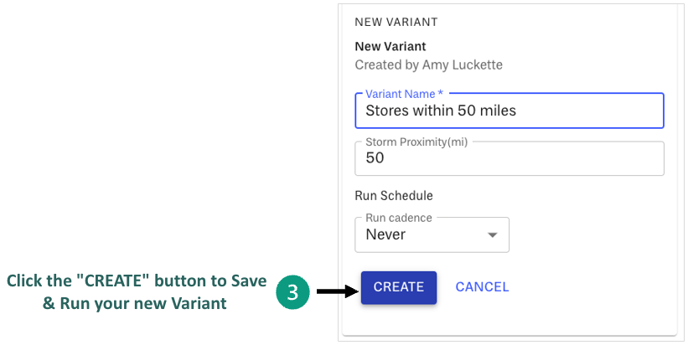
Create a Variant
-
Open an App & Click the "SETTINGS" button in the top right corner
-
Click the "CREATE A NEW VARIANT" button to set your unique Parameter Values
Optionally set a Run Schedule
-
Click the "CREATE" button to Save & Run your new Variant. Note: This Action Impacts Compute Costs
Optionally set a Run Schedule
Optionally click the "CANCEL" button to stop creating a new variant


Open a Variant
To view a Variant and see the App with its unique parameter values, you have two (2) options:
-
Option 1: Navigate to the App and choose the variant you want from the Variant dropdown. This will render the view of that specific App Variant.

-
Option 2: From the App Settings page, click the vertical dots on the top right of the variant you wish to open, then select "Open Variant." This will take you to view that specific App Variant.

View a Variant (View an App)
When you view a variant, you are looking at an app and its visualizations. By default, every app is based on specific parameter values unique to the app variant you're viewing. As you view an app, which is a variant, you will notice informative chips at the top of the screen that give you context into the parameter values used to run the analysis for that particular variant.
The app variant example below is the Seek-provided default variant for our Distribution Expander App. The chip next to the variant dropdown shows you that the analysis ran with a start date parameter value of 2022-06-30.
Switch Variants
To switch between different Variants while viewing an App, select the desired Variant from the Insight Variant Dropdown. If the Variant you choose is still undergoing analysis, a loading icon will appear to the left of the option.

Edit a Variant
To update the parameter values of an existing App Variant, go to the Settings page of the App. Click on the vertical dots on the Variant card you wish to modify, then select "Edit Variant." Adjust the parameter values as needed, and then click on the "CREATE" button to save your changes. If you decide not to proceed, click on "CANCEL." Keep in mind that each Variant is unique due to its parameter values, so Insight Cloud prevents the creation of a variant with identical parameters to an existing one.
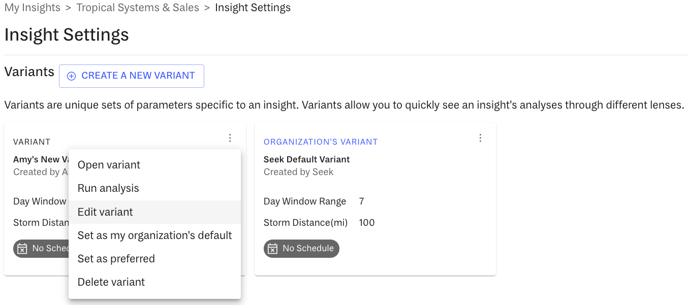
Delete a Variant
To remove a Variant, go to the App Settings Page, then click on the vertical dots on the App Variant Card. Choose the "Delete Variant" option. Confirm your decision by clicking "DELETE" on the confirmation modal. You can also click on "CANCEL" to stop the deletion process if needed. 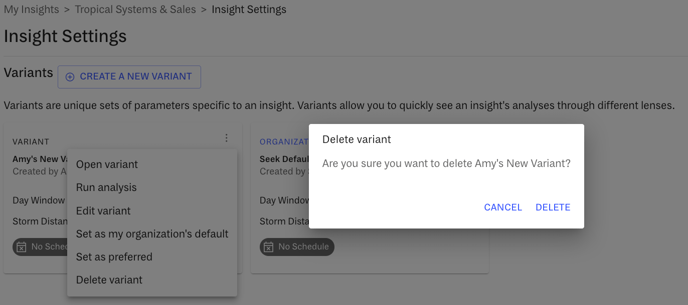
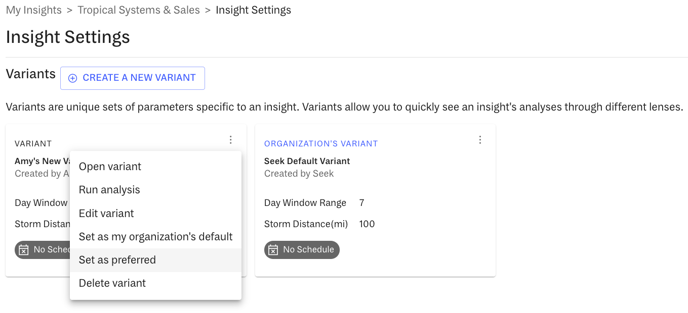
Set a Variant as My Preferred
To designate a Variant as your personal preference, access the "Settings" option in the top right corner of the App. Then, click on the three vertical dots on the variant card you wish to set as your preferred. Choose the "Set as preferred" option. By selecting a preferred variant, it will automatically display that variant's results whenever you access the app. This means that whenever you open or refresh the app, your preferred variant will be loaded. To ensure quick loading times for your preferred variant, we recommend running the analysis during off-hours or on weekends.
Set a Variant as My Orgs Default Variant
To set a Variant as the default for your organization, go to the "Settings" option in the top right corner of the App. Then, click on the three vertical dots on the variant card you want to designate as the default for your organization. Select the "Set as my organization's default" option. Choosing a default variant for your org will automatically show that variant's results whenever anyone in your organization accesses the app. If you have a personally preferred variant, it will always take precedence over the organization's default variant when you open or refresh the app.
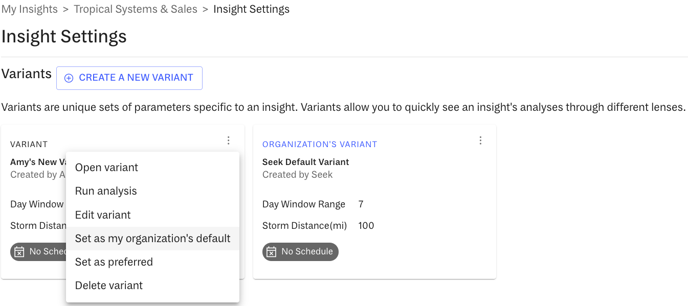
Audit Variants
As an organization administrator, you can review all the variants for each app. Go to the "Variants" page in the Org Admin panel by clicking on your Org's Name. Stay on the VARIANTS tab to access a list of all the variants created by members of your organization. From this page, you can delete unwanted variants and even set a specific variant as the default for a particular app. To access these options, expand the app row in the variants table, click on the vertical ellipses next to the variant, and then choose whether to set it as the organization's default variant or delete it.

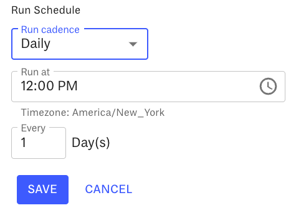
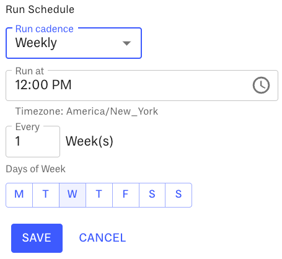
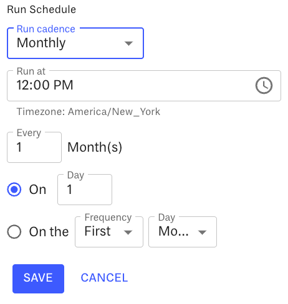
Schedule Analysis
To set up a schedule for running the analysis on an App Variant, go to the app and click on the "Settings" button in the top right corner. Then, select "Edit Variant." Choose a frequency for running the analysis, such as Daily, Weekly, or Monthly, and customize the specifics. Finally, click on "SAVE" to confirm your schedule. If you decide not to schedule the analysis, click "CANCEL." We recommend that you schedule the analysis to run 2-3 hours before you plan to access the app results. This will help ensure a smooth user experience since analyzing billions of data rows can take a considerable amount of time.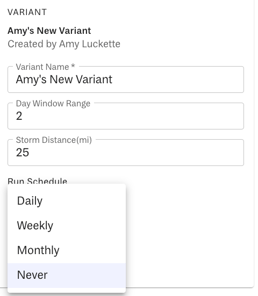
Immediately Run Analysis
If you wish to run the analysis on a Variant immediately, please note that this option may result in a significant wait time for the results to be generated. It's important to be aware that running the analysis on an App Variant incurs compute costs each time. To manually initiate the analysis, click on the "Settings" button located in the top right corner of the app. Then, select the specific variant card you want to analyze by clicking on the three vertical dots. Choose the "Run Analysis" option and confirm by clicking "MANUALLY RUN" on the confirmation dialog. Alternatively, you may click the "CANCEL" option if you choose not to run the analysis at this time. 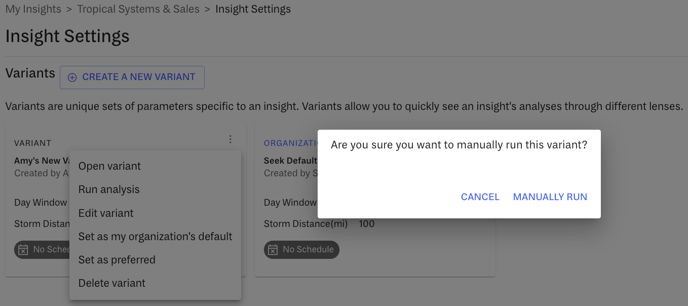
Create a Bookmark
Save Applied Filters
To save your applied filters to an App, you can create a "Bookmark." To create a bookmark, click on the bookmark icon at the top right of the App Filters.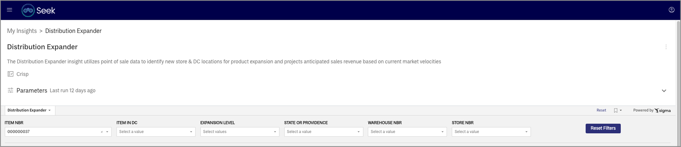
If you haven't saved any applied filters on the App, the bookmark icon will be transparent. If you have saved any applied filters on the App, the bookmark icon will be filled green.
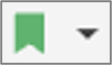
If no saved filtered views exist yet, upon clicking the bookmark icon, you'll see the option to "Save as new bookmark." To save follow these steps:
-
Click "Save as new bookmark."
-
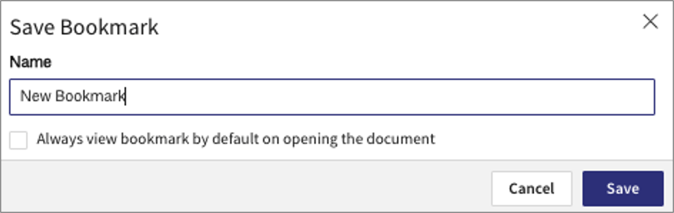
IMPORTANT: Scroll down to the center of your App screen to view the "Save as new bookmark" modal.
-
Name your new bookmark (Filtered App View)
-
Optional: Click the checkbox to "Always view bookmark by default on opening or refreshing the App"
-
Click SAVE to save changes
-
Click Cancel to discard changes
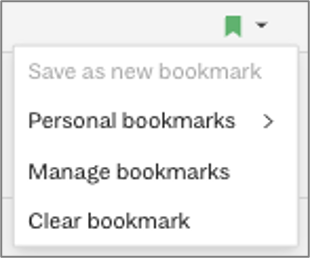
If you already have a saved filtered view (a bookmark), upon clicking the bookmark icon, you'll see the options:
-
-
Bookmarks
-
Manage Bookmarks
-
Clear Bookmark
-
Open your Saved Filtered View
To view a different saved filtered view of an App, click "Bookmarks" then select which view you'd like to render on your screen.
Delete a Saved Filtered View
To delete a saved filtered view of an App, click "Manage bookmarks" then click the delete icon next to the view you'd like to delete. Remember to save your changes by clicking "Done".
Rename a Saved Filtered View
To rename a saved filtered view of an App, click "Manage bookmarks" then click the text box of the current bookmark name and change it. Remember to save your changes by clicking "Done".
Set a Saved Filtered View as your Default View
While managing your bookmarks, you have the option to set a different saved filtered view as your default view upon opening or refreshing App.
Clear or Reset a Filtered View
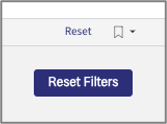
To clear the filters applied to an App on a Saved Bookmarked View, you have two options, you can click "Reset" next to the bookmark icon, you can click "Clear bookmark" on the bookmark dropdown, or you can click the "clear filters" button. NOTE: your saved filtered view will still be saved to the bookmark, this clears/resets all applied filters that you're currently viewing.
Note: If the saved filtered view (a bookmark) was set as your default view, if you reset/clear the filters and then refresh your browser, the saved filters associated with your default view will reapply. 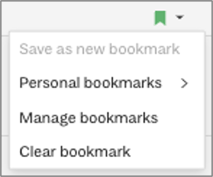
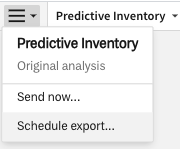
Configure Rule Based Email Exports
To set up rule-based email exports for Apps or App elements, open an App and click on the menu icon (also known as the hamburger menu) on the left side of the embedded App page. For instance, in the Predictive Inventory App, clicking on the hamburger menu icon allows you to choose "Send now..." to instantly export the App via email. Alternatively, you can select "Schedule export..." to arrange a scheduled email export for a future date.
Export App Now
To instantly send an export, click on "Send now..." and then fill out the required fields in the Send Now modal that appears at the center of the App screen. These fields include Recipient, Subject, Message, Attachments, and More Options like running queries as a recipient. Once you have completed filling in the fields, click on the "Send" button located at the bottom right corner of the Send Now modal. Note: You may need to scroll down to view this modal.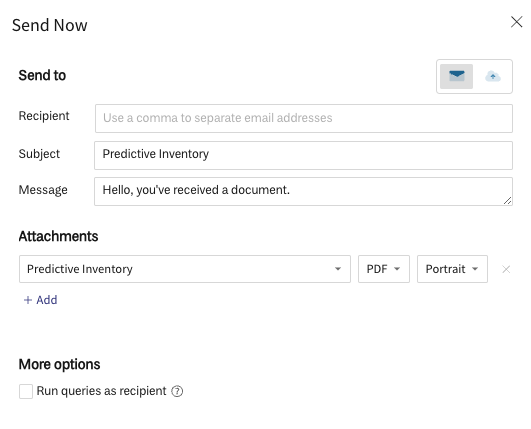
To schedule email exports for App or App elements, select the "Schedule export..." option. If you haven't created any schedules yet, the menu will show "No schedules exist for this workbook" and guide you to "Add Schedule" by clicking the "Add Schedule" button in the modal. Please note that you may need to scroll down to view this modal after selecting the "Schedule Export..." menu option.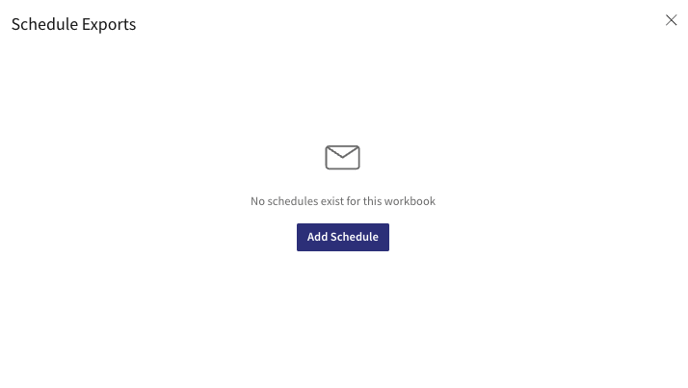
Once you click on "Add Schedule," a window called "Schedule Exports" will appear. In this window, you can set conditions by activating the "Conditions" toggle at the top right of this window. After setting the conditions, you can test them out. The window also includes a "Send to" section where you can fill in the recipient, subject, message, and attachments fields. You have the choice to send the entire App page or select specific elements like charts, graphs, metrics, or tables to export. You can export in various formats such as PDFs, images, Excel, and .csv files in portrait or landscape layout. Additionally, you can include multiple attachments in your email by using the "Add" option in the "Attachments" section. The window also offers a "Frequency" section for selecting how often you want to send the export. Other options like "Run Queries as recipient" and "Customize control values" are also available. Once you finish setting up your scheduled export, click the "Create" button at the bottom right corner of the "Schedule Exports" window.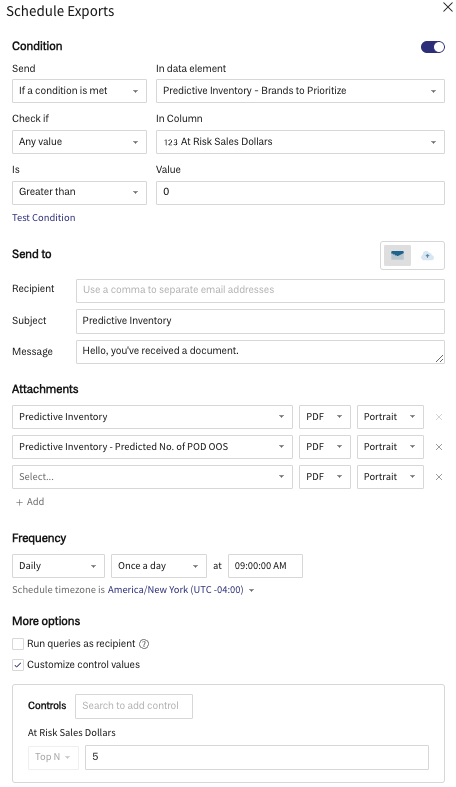
After setting up a scheduled export on this App, the "Schedule Exports" Modal will show your schedule(s) in a table with these columns: Summary, Recipients, Status, and Actions. Actions available include options to Rename Schedule, Edit, Send now, Pause, and Delete.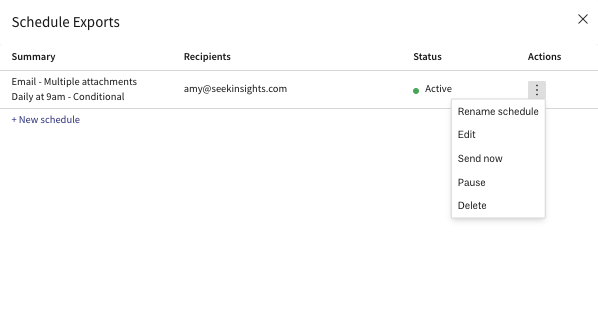
Enable Explore Mode
To activate explore mode, ensure it is enabled for your Production account. Verify this with your Seek Customer Success Manager. If the option is available, you can turn on Explore mode for a specific App by following these steps:
1. Navigate to an App: Open the App you wish to explore further.
2. Activate Explore Mode: In the top right corner of the App, toggle-on the Explore Mode switch.
3. Access Explore Pane: Once Explore Mode is turned on, the explore pane will appear on the left side of the App for further exploration.

What is Explore Mode?
Explore Mode in Insight Cloud serves as your toolbox for customizing your apps. It allows you to adjust views and create dashboards using data tables, all while preserving the carefully crafted visuals provided by Seek. This feature empowers you to add your unique touch to Insight Cloud, making it truly yours while benefiting from Seek's expertly curated apps. Dive in, explore, and tailor your apps to suit your needs.
Who is Explore Mode for?
All user roles within Insight Cloud, including Org Admin, Engineer, and Consumer, are granted access to Explore Mode once it is enabled for your Organization. This feature allows you to directly engage with Seek's integrated Business Intelligence Partner tool, Sigma, enabling Expert Business Intelligence Analysts to leverage their experience in creating content using Sigma. For a comprehensive guide on using Explore Mode, refer to Sigma’s Explore Mode User Docs.
Explore Mode Basics
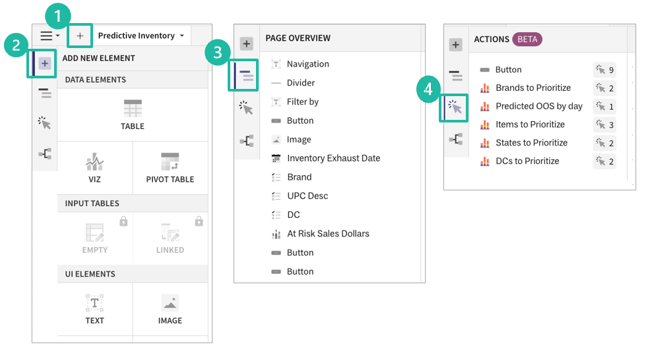
Seek provides users with the opportunity to customize Apps by leveraging Explore Mode in collaboration with our Strategic Partner; Sigma Computing. Upon enabling Explore Mode on an App, users can access a range of basic high-level actions. For a comprehensive guide on using Explore Mode, refer to Sigma’s Explore Mode User Docs.- Add Page: Create new pages within the App for organizing your exploration.
- Add Element: Add new elements to visualize and analyze data.
- Page Overview: Get an overview of all elements within the App.
- Actions (Beta): Access additional actions to enhance your exploration experience.
Save your Explorations
To revisit your explorations later on, make sure to save them by creating a bookmark after exploring. This way, your exploration will be saved in your managed bookmarks. To save your explorations for future access, use the Bookmarks Feature on the App that you explored. Please note that currently, you can only save explorations at the user level, not at the org level.
Share your Explorations
Effortlessly share your customized apps with your team using the Email Export Feature. You can also use the Export App Now feature. Navigate to the App you've explored, and with just a few clicks, you can seamlessly send it to your colleagues.